Introduction
In last post about creating own project in Java we made setup of Customer Notes application. Now it’s time to show to deal with database. In this post I prepared for You instruction how to save data in our application using Spring Data module. After today’s post You will know what acronym CRUD means and how to apply it to own application.
Familiarization with unknown topics
In introduction I mentioned about CRUD and Spring Data, I’m going to explain shortly what is going on. If You are familiar with these topics You can omit this part and start from implementation but nevertheless I want to encourage to You to look into it, maybe You will find something that You didn’t know.
ORM
Object-relational mapping is mechanism that allows to manipulate objects without having to consider how those objecr relate to their data sources.
CRUD
CRUD is acronym for Create, Read, Update, Delete. These are the basic operations which You can perform on data that correspond operations on database such as INSERT, SELECT, UPDATE, DELETE respectively. When someone says about simple CRUD application, it means about application that provides only operations mentioned here.
Spring Data
Spring Data – project which goal is to provide a familiar and consistent, Spring-based programming model for data access. This is solution which is based on JPA (Java Persistence API and helps to deal with database in Spring application in simple words. This project realizes i.a. Repository Pattern and allow us (programmers) to create queries in easy way by providing method with appropriate name which in guts will be translated to respective SQL query.
Implementation
I think that it is about time that we can start changing Customer Notes application’s code to be able to save data in database.
Entities
Entity is just class which represents data from one table in database. In our case we have to implement exactly two entities: Customer and Note in package com.customernotes.notes.
package com.customernotes.notes;

import org.hibernate.annotations.GenericGenerator;
import javax.persistence.*;
import java.util.Set;

@Entity
@Table(name = "CUSTOMER") //You could get rid of this annotation using @Entity(name="CUSTOMER") but it will cause little issues when writing queries
public class CustomerEntity {

    @Id
    @GenericGenerator(
            name = "customer_sequence_generator",
            strategy = "org.hibernate.id.enhanced.SequenceStyleGenerator",
            parameters = {
                    @org.hibernate.annotations.Parameter(name = "sequence_name", value = "CUSTOMER_ID_SEQ")
            }
    )
    @GeneratedValue(strategy = GenerationType.SEQUENCE, generator = "customer_sequence_generator")
    private Long id;

//    ID can be generated also in this way if You don't want to rely on Sequences created previously
//    @Id
//    @GeneratedValue(strategy = GenerationType.AUTO)
//    private Long id;

    private String firstName;
    private String lastName;

    @OneToMany(mappedBy = "customer")  //This annotation allow us access to notes created for particular customer directly from this class
    private Set<NoteEntity> notes;

    //getters and setters
}
package com.customernotes.notes;

import org.hibernate.annotations.GenericGenerator;
import javax.persistence.*;
import java.time.ZonedDateTime;

@Entity
@Table(name="NOTE")
public class NoteEntity {

    @Id
    @GenericGenerator(
            name = "note_sequence_generator",
            strategy = "org.hibernate.id.enhanced.SequenceStyleGenerator",
            parameters = {
                    @org.hibernate.annotations.Parameter(name = "sequence_name", value = "CUSTOMER_ID_SEQ")
            }
    )
    @GeneratedValue(strategy = GenerationType.SEQUENCE, generator = "note_sequence_generator")
    private Long id;

    private String title;
    private String privateNote;
    private String arrangements;
    private ZonedDateTime createdDate; //will be mapped in db as created_date

    @ManyToOne
    private CustomerEntity customer;

    //getter and setter
}
This is good moment for explanation what is the purpose of particular annotation.
@Entity – specifies that class is an entity and is applied on class. (Required)
@Table – annotation used to specify primary table for annotated entity. This annotation is useful when name of entity class cannot be mapped by JPA to corresponding table name. We don’t need it when class would have name Customer or table name would be CUSTOMER_ENTITY.
@Id – used to point out the primary key of an entity. (Required)
@GeneratedValue – Provides for the specification of generation strategies for the values of primary keys.
@ManyToOne – Defines single-valued association to another entity class.
@OneToMany – Defines a many-valued association with one-to-many multiplicity.
First CRUD Repository – deal with database
Repository is interface that allows us to make any operation on database. To create repository it’s enought to extend CrudRepository interface which provides basic operations such as save(), findOne(), findAll(), count(), delete() and exists(). Let’s create interfaces called CustomerRepository and NoteRepository to deal with database and see how magic happens 😉
package com.customernotes.notes;

import org.springframework.data.repository.CrudRepository;

public interface CustomerRepository extends CrudRepository<CustomerEntity, Long> {
}
package com.customernotes.notes;

import org.springframework.data.repository.CrudRepository;

public interface NoteRepository extends CrudRepository<NoteEntity, Long> {
}
This is enough that we need to be able to save, read and modify data in database. CrudRepository i parametrized type which needs type of entity that we want to manipulate and type of primary key.
Service Layer
To keep our controller clean we are going to delegate most of job for service which is responsible for operation on data. For now our operations will be quite simple but in future it can become more complex. Maybe we would like to send emails with any arrangements, save additional data or perform other complex operation.
It’s nice when controller is clear and doesn’t contain any implementation details. We can create service class in spring with help of @Service annotation.
We will need to create Customer in our database to have possibility to assign notes to someone so I prepared service for that.
@Service
public class CustomerService {
    @Autowired
    private CustomerRepository customerRepository;

    public Customer createCustomer(Customer customer){
        CustomerEntity entity = new CustomerEntity();
        entity.setFirstName(customer.getFirstName());
        entity.setLastName(customer.getLastName());
        CustomerEntity saved = customerRepository.save(entity);
        return mapToCustomer(saved);
    }

    private Customer mapToCustomer(CustomerEntity saved) {
        Customer cust = new Customer();
        cust.setId(saved.getId());
        cust.setFirstName(saved.getFirstName());
        cust.setLastName(saved.getLastName());
        return cust;
    }
}
@Autowired – annotation that we are using to inject implementation to this field.
@Service
public class NoteService {

    @Autowired
    private NoteRepository noteRepository;
    @Autowired
    private CustomerRepository customerRepository;

    public Note createNote(Note note) {
        Optional<CustomerEntity> customer = customerRepository.findById(note.getCustomerId());
        //it could be done better, normally recommended would be throwing an exception
        if (customer.isPresent()) {
            NoteEntity entity = new NoteEntity();
            entity.setTitle(note.getTitle());
            entity.setArrangements(note.getArrangements());
            entity.setCustomer(customer.orElse(null));
            entity.setPrivateNote(note.getPrivateNote());
            entity.setCreatedDate(ZonedDateTime.now());
            NoteEntity save = noteRepository.save(entity);
            Note createdNote = mapToNote(save);
            return createdNote;
        }
        return null;
    }

    public List<Note> getNotes() {
        List<Note> notes = new ArrayList<>();
        noteRepository.findAll().forEach(noteEntity -> notes.add(mapToNote(noteEntity)));
        return notes;
    }

    public Note updateNote(Long noteId, Note note) {
        Optional<NoteEntity> noteEntity = noteRepository.findById(noteId);
        if (noteEntity.isPresent()) {
            NoteEntity noteEntityToUpdate = noteEntity.orElse(null);//this is not recommended, but for now it's enough, we will fix it next time
            noteEntityToUpdate.setPrivateNote(note.getPrivateNote());
            noteEntityToUpdate.setArrangements(note.getArrangements());
            noteEntityToUpdate.setTitle(note.getTitle());
            return mapToNote(noteRepository.save(noteEntityToUpdate));
        }
        return null;
    }

    public void deleteNote(Long id) {
        noteRepository.deleteById(id);

    }

    private Note mapToNote(NoteEntity entity) {
        Note createdNote = new Note();
        createdNote.setId(entity.getId());
        createdNote.setArrangements(entity.getArrangements());
        createdNote.setTitle(entity.getTitle());
        createdNote.setPrivateNote(entity.getPrivateNote());
        createdNote.setCustomerId(entity.getCustomer().getId());
        return createdNote;
    }
}
Our Note Service is a little bit more complicated and maybe You already see that this code isn’t beautiful and is good candidate for refactoring. There is also lack of exceptions that would inform us about any wrong bahavior or state in database. We will do it next time, I will show You then how to do part of this work automatically.
Rest controller adaptation
Now it’s time to use service that we prepared earlier in controller as well as create methods that will be responsible for handling CRUD operations as REST Api.
Our controllers looks as follows:
@RestController
@RequestMapping("/api/customers")
public class CustomerController {
    @Autowired
    private CustomerService service;

    @PostMapping
    public Customer createCustomer(@RequestBody Customer customer){
        return service.createCustomer(customer);
    }
}
CustomerController is only needed to be able to create customer that will be used to create notes, so don’t focus too much on it and lets implement NoteController. First we have to get rid of out fake data generator, second thing to do it creating CRUD REST API which we will do by implementing POST, GET, PUT and DELETE methods in NoteController.
@RestController
@RequestMapping("/api/notes")
public class NoteController {

    @Autowired
    private NoteService service;

    @GetMapping
    public List<Note> getNotes() {
        return service.getNotes();
    }

    @PostMapping
    public Note createNote(@RequestBody Note note) {
        return service.createNote(note);
    }

    @PutMapping("/{id}")
    public Note updateNote(@PathVariable("id")Long id, @RequestBody Note note){
        return service.updateNote(id, note);
    }

    @DeleteMapping("/{id}")
    public void deleteNote(@PathVariable("id")Long id){
        service.deleteNote(id);
    }
}
Since our controller is ready we can test it using postman.
Test application using Postman
It’s time for manual testing of our simple application if it is really able to deal with database.
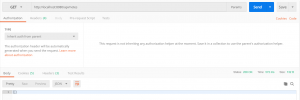
First try to fetch all notes to see that nothing is returned from database
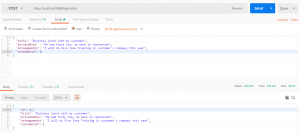
Now we can create first note but before we will do it it’s necessary to create customer for whom we are going to address it.

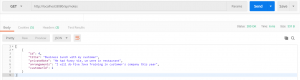
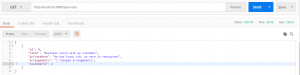
Having customer id we can create note. Let’s do it by calling POST on /api/notes and check if it was really created by calling GET on the same path.
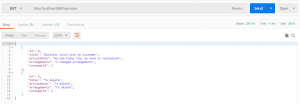
Seems to be working as expected. We can try to update arrangements of this note.
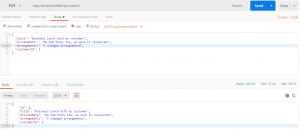
And check again if application updated database.
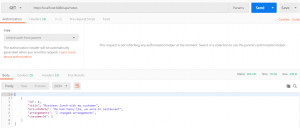
It went successfully, note has been updated. It’s time to test DELETE method, to do it, create new note which we will delete. I already created one and it is visible after getting all notes.
Having ID of newly created note we can remove it by calling DELETE on path /api/notes/{id}

After fetching entire list again we can observe that note with above id don’t exist anymore and it means that our delete is working fine.
As You can see everything works like a charm. Our application, as well as You, know how to deal with database, so I fullfilled the goal of this post. Don’t forget to check database if we really saved data 😉 I hope that You are happy about having knowledge which allows You building more complex applications.
As an excercise I would recommend You to implement fetching Notes for particular customer. To do it create rest endpoint /api/customers/{customerId}/notes. To fetch notes from db You can use list that is located in CustomerEntity. Have fun!
Summary
After going through this post You should be able to write own simple application with Spring Boot with implemented persistence layer. You have learned what Entity is and how Repository is working. From now we will be focused mostly on improvements of code that we created till now.
Code available on my github.
About author

Hi,
my name is Michał. I’m software engineer. I like sharing my knowledge and ideas to help other people who struggle with technologies and design of todays IT systems or just want to learn something new.
If you want to be up to date leave your email below or leave invitation on LinkedIn, XING or Twitter.


1 Comment
Jakub · 07/30/2019 at 13:05
Nice one